Two Easy Projects and One Left to the Professionals

Project One: The Basement Lights
The first mini project was installing two new basement light fixtures. I basically just replaced the old porcelain fixtures with the newer versions that worked.
I could have gone with a fancier setup. However, the basement is not really a place I want to invest a lot of my money into, and these lights were fairly cheap.
The replacement of the fixtures was super quick, and the whole process only took about 15 minutes. One bonus of the newer light fixtures is the added access to a three-pin plug if I need to temporarily power something.
I only encountered two issues with the whole project. The first issue was making sure the light fixtures did not have power. I had to carefully take it apart and touch the neutral and hot with a multimeter to check for power.

The Second Issue
The Romex wires were cloth and very brittle. Anyone working on a newer home will likely not even encounter this issue.
As a mini project, there is not a lot to write about, but it was one of the easiest projects that yielded some of the most satisfaction.
Project Two: Headlight Restoration
For project two, I tested a headlight restoration trick using toothpaste. This project was more of a nicety than a necessity, which is rare and a pleasant change of pace.
I had some toothpaste with baking soda and thought, why not? The results were better than I expected, but not much more.
The toothpaste worked great on my Mazda but did not do much on my Porsche headlights. I did put on a ceramic wax to help keep the results, and it seemed to work for the most part. After about a month, I have noticed the headlights on my Mazda looking a bit hazy again.


I have bought a proper restore kit for my wife’s car, and it worked a good bit better and has lasted much longer without looking hazy. With that said, the headlight restoration kit did take three times longer, so perhaps with a bit more effort the toothpaste trick could get equal results.
Although toothpaste with baking soda works, it has many drawbacks. Some of the drawbacks include being pricey for the quantity size and only having a small amount of the baking soda in it (which is the key ingredient in making it work).
In the future I would like to expand the test with other home goods that might be more effective. Some of the items I would like to test compared to toothpaste are a baking soda slurry, The Pink Stuff, or even Bar Keeper's Friend.
Hopefully in the future I can gather enough products to do a whole post on alternatives to headlight restoration kits.
Project Three: The New and Old Bathroom Light
The bathroom light project has certainly added time onto publishing the blog. The project was stalled due to a wire hidden in a wall and needing an assessment from the attic. When I finally got around to the attic assessment, it was merely leftover Romex.
I initially only had two projects for this post to include. However, two projects were not really enough for a post. Additionally, my guilt for not doing the project crept up on me.
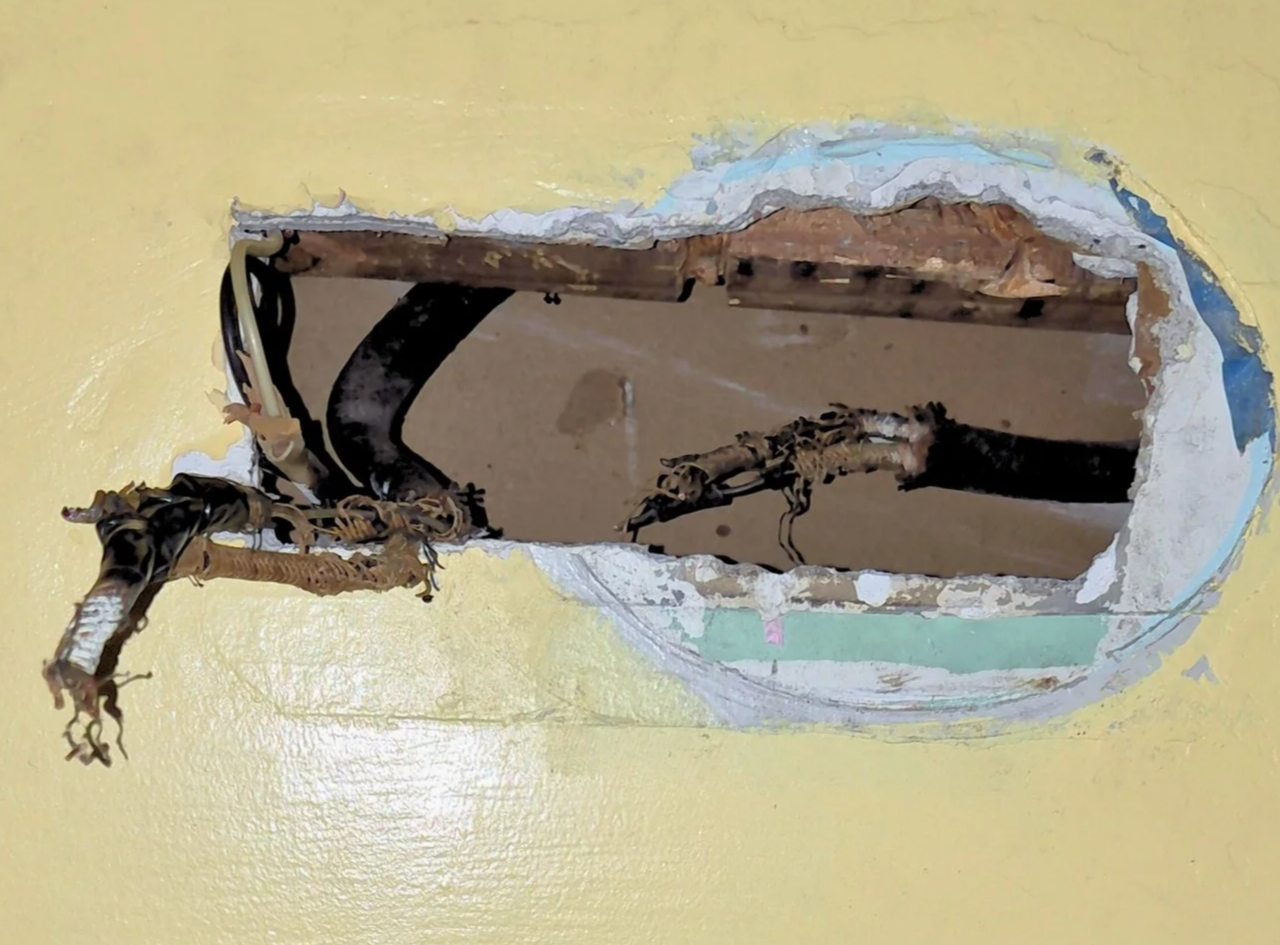
As with most of my projects, the bathroom light was not as easy as moving the light fixture box over. The cloth wires were too short to properly center the light. Additionally, the cloth wires were falling apart on me.
Normally I am upset when a project becomes bigger than it should be. However, this project outgrowing my expectations could have the added benefit of saving my life.
Another Issue with the Wires
The wire that runs to the bathroom light is like a junction box to send power to multiple areas, one of which is near where I sleep at night. To replace the wires, I needed to remove the outlet box, which, of course, is the one near where I sleep. Oh boy, I am glad I did. I wish I could have gotten a picture of what I found, but I was too in the moment to stop.
From what I can tell, the house was built with knob and tube and eventually upgraded to cloth wire. The cloth Romex was installed professionally, as it was very well secured to the studs and ran neatly. However, in either an act of laziness or a cost-saving measure, they did not use wire nuts to pigtail connections.
What I found instead of wire nuts for the pigtails was electrical tape. What I cannot seem to understand is why. I understand in a light box such as in the basement where there is only one set of screws. However, a typical electrical outlet has four screws for this purpose. Perhaps back when it was done, outlets were not equipped with four screws.
Regardless, the fact that the person skipped wire nuts and used electrical tape is terrifying. The tape had all but fallen off, and the only thing that was protecting the wires from touching the metal box was the residue from the tape, which had sealed the wires like ancient bugs in amber.
A Progress Report on the Light Fixture
To meet code, I need to call an electrician out to wire in a grounded Romex and install a new 15 amp ACFI breaker. Once the electrician is finished with that, I can move on to applying for a permit and installing the new wire.
Overall, the project shouldn’t be too difficult once things get moving. The most difficult challenge will be replacing all the wire, especially the ones running up to the attic.
As I mentioned previously, the light fixture is not the end point but rather a junction box to countless other things. I have the wires going to the exhaust fan light, to a ceiling fan, and to who knows what else. In total there are six to eight wires that will need to be wired up or replaced.
Conclusion and Buy Me a Coffee
While only two projects are technically finished, I wanted to share the progress of the bathroom light, as I have made a lot of progress with it as of late. The next blog post will be on projects that are not do-it-yourself but other hobbies of mine.
I would love to continue writing on the light fixture project, but I am not sure when I will have the money to hire an electrician and would rather put something up on the blog than wait. I apologize that money is always a constraint on this blog, but I hope to fix that slightly by picking up hours at my job.
If you enjoyed this post, please consider donating to my Buy Me a Coffee. It will go a long way in helping motivate me to push out posts and give me enough money to buy materials and tools for content. Thanks for reading, and catch you in the next one.